Category Archives: Vegetable Gardening

Window Box Herb Garden

Want to have your fun and eat it too? How about picking up a selection of herb seedlings and planting them in containers? You can plant them on your deck, on a sunny porch, right outside your kitchen window. Or as Garden Club member Cena Hampden demonstrates here, it’s easy to plant them in window boxes that allow you to reach right outside and harvest fresh herbs to snip on your pasta or add to your salads.

by Cena Hampden

Cena is the Greenhouse Co-Chair of the Garden Club of Irvington. She is responsible, with Dori Ruff, for ensuring a bountiful and healthy crop of annuals that our members grow all year in the Lyndhurst Greenhouse and sell at the plant sale held on the day before Mother’s Day. In this spring and early summer of Covid-19, Cena is turning her attention to delectable edibles that she harvests by reaching out her front window. She writes:

This year’s renewed interest in planting edibles moved me to think about how I could participate in the trend. Each summer, the window box spanning the front of my house has sported an array of colorful flowers. Lacking a yard with sufficient sun and protection from critters (not to mention my lack of desire to cultivate another garden) I can hardly keep up with what I have. So I eyed my window boxes.

I moved the window box liners to the patio.

I emptied half the old soil into a wheelbarrow, and with a small trowel mixed it with potting soil purchased at Reader’s Hardware in Dobbs Ferry. I set aside the other half of the old soil to use in the garden or to mix with new soil to fill other pots. Working on each liner in the wheelbarrow, rather than on the ground or on a potting bench, I was able to avoid extra cleanup of spilled soil.

Small in scale with foliage of different shapes, textures and variegated leaves, herbs seemed especially suitable. In addition to oregano, thyme and sage — perennials I can transplant into the garden —  I chose parsley, coriander, rosemary and arugula (not sure it qualifies as an herb, but it adds peppery flavor to salads).

For greater ease, I selected seedlings and plants rather than starting from seed. The seedlings came from Home Grown Nurseries, run by Nick Storrs who grows in the propagating shed at Lyndhurst adjacent to the one used for annuals by the Garden Club of Irvington.

After ordering online I was able to pick up the seedlings at the Hastings Farmers Market. The perennials were purchased at Westchester Farms. After only one week the growth was noticeable. I’m especially happy with the variegated oregano and thyme.

Now for the fun part! I can harvest the herbs while I’m indoors, and thanks to a generous roof overhang I won’t even get wet in the rain. I also look forward to those beautiful parsley caterpillars (black swallowtail butterflies) who will be sharing the produce.


Filed under Horticulture, Vegetable Gardening

City Pickers for a Suburban Harvest

Learn how one Irvington family is deepening their connection to the earth and each other (and having fun) by growing their own food — using some very interesting, rewarding, and easy-to-emulate methodologies.

by Gwen Merkin

Irvington resident Gwen Merkin, Program Manager for Corporate Sustainability at UL, has more than ten years experience in the fields of energy efficiency, corporate sustainability, green building, waste auditing, and city planning. She lives in a pondside house near Sunnyside Lane with her husband, Ryan Merkin, also a leader in building science and energy consulting, and their two young daughters. She spends her limited free time fostering connections between people and the Earth, and loves the magic of plants.

Throughout the quarantine, our family has found growing our own food to be incredibly soothing — from the bonding it brings as a family activity, to the wonders of nature and science, to the confidence of increasing self-sufficiency. We are feeling grateful for our deepening connection to nature.

Last year, after years of tinkering with vegetable gardening that resulted in very small yields, we bought three City Pickers, which are mobile, self-watering, raised-bed grow boxes. The plants live above an aeration screen that enhances the oxygen flow to roots and encourages faster growth. They worked really well for snap peas, cucumbers, arugula and kale.

This year, we bought two more City Pickers and seven Earth Boxes (a similar solution, made from recycled-content plastic), and decided to test a few more strategies to see if — on our 200-square foot deck and a plot in the back yard below — we can produce enough veggies to feed four adults and two children throughout the summer and early fall.

We started from seeds we’d been collecting over the last few years, plus a few purchased online from Seed Savers Exchange. We planted them in a combination of trays designed for growing seedlings, hydroponics (for lettuce), recyclable plastic salad containers (which are maddening as a single-use product), plus direct sowing into the 12 City Pickers and Earth Boxes. We borrowed a grow light to help expedite the process of turning the seedlings into viable plants.

We like this Parks’ domed seed-starting tray with 60 cells.

We use bagged potting mix — which is soil-less and designed to maximize growth in pots. The raised-bed systems require it — plus a blend of dolomite (crushed limestone) and organic fertilizer. We’re growing cucumbers, kale, mustard greens, arugula, lettuce, tomatoes, broccoli, carrots, cilantro, and basil. The ‘garden’ is up on our deck so we don’t create a tasty buffet for the abundant deer and geese.

The black plastic ‘mulch’ comes with the Earth Boxes. It helps retain moisture and keeps the weeds and critters out. In this box, we’re growing arugula and snap peas. You water the Earth Box through the pipe in the corner. The water is stored in the bottom of the container and the plants suck it in; you can’t overwater because the excess drains out through the bottom.

This is our electric hydroponic grow station, in which we’re growing butterhead lettuce. The dials on the bottom let us know if we need to add water or food. It took approximately three weeks from planting until we were able to enjoy the first crop (it was good)! The next round should be ready in half the time; the leaves are getting big again.

We put all our food scraps (except for meat, cheese, fish) in this FCMP Outdoor Tumbling Composter, and it makes amazing compost fertilizer. We start with an equal volume of leaves and vegetable peels and scraps. In spring temperatures it takes three to four weeks to make compost; it’s a lot slower in the colder months and faster in the summer. I also bury unfinished compost right in the backyard, and have seen it transform our clay soil into beautiful, worm-filled garden beds.

We are obsessed with watching the magical process unfold.

While our six- and eight-year-olds have not yet taken to eating salads (in a bowl, anyway), they love to pick leaves straight from the plants and pop them into their mouths!


Filed under Conservation, Horticulture, Rivertowns Westchester NY, Vegetable Gardening

Have You Tried Growing Potatoes?

By Isa Hetzel
Garden Club member Isa Hetzel is an interior designer who lives in Hastings-on-Hudson, New York

Digging up potatoes near summer’s end is one of the most rewarding, delicious, and surprising events in gardening. It’s bit like a scavenger hunt. You never know exactly where or what you will find. It might be a bunch of little ones all together, or a nice fat golden tuber in the dark earth.

Though not commonly grown in home gardens, potatoes are among the easier vegetables to try, with good results. “Seed” potatoes, the potatoes from which a new crop is started, are often bought from nurseries online and locally. Since this year presents a particular difficulty, you can try potatoes you have on hand or buy at the grocery store. I’ve done both with success. If you google “growing potatoes,” the ‘rules’ will tell you that store-bought potatoes are sprayed with sprouting inhibitor, but it hasn’t made a difference in my experience.

So, here is what you will need:

• A bag of potatoes. I like the very small ones, no larger than an egg; organic if possible. If you have larger ones, no problem.

• A sharp knife.

• Some compost if your soil is hard like clay. Potatoes prefer loose, loamy, rich soil with very good drainage. The amount of compost you might add depends on how much amending your soil requires. I use bagged Lobster Compost from Maine. The soil where mine are planted is loamy to begin with so I don’t need to add much.

• A little organic granular fertilizer.

• A digging shovel and a trowel.

• A small plot of ground. I’ve chosen a section that gets at least 6 hours of direct sunlight every day, and measures about 7 x 3 feet. You’ll need enough space around the plot to walk around and to reach the plot to weed and to dig up the potatoes. So plan accordingly. If you are doing a larger area, you might divide the planting into two sections, a couple of rows with space in between. They will need to be watered frequently in dry weather, so keep that in mind.

Order of Things:

First, dig up the ground about 8 to 10″ deep, loosening it and turning it over. Add compost and mix it up. You might want to add a little organic granular fertilizer. Even up the surface a bit.

Next, cut each piece in about half. Make sure that each piece you plant has an ‘eye’ or two, which will be the sprouting points. If the potatoes are quite small, you can use the whole potato. If they are rather large, you might want to cut them into half or in three pieces. Each piece may produce several tuber roots, which are the potatoes.

Using the trowel, dig holes roughly 6″ deep, drop in a potato and roughly cover it with soil. Do this in rows, which will help you keep track of where you have planted them, with the potatoes about 8″ apart in all directions. Smooth the top of the soil. By planting them this deep, the tubers will develop below the soil surface and won’t be exposed to the sun, which can make them green and bitter

You can cover the rows with mulch, such as straw, which will help retain moisture and keep the light off the tubers if they get too near the surface.

If the soil is not too dry and rain is expected, you can get along without watering. They will need less water at the beginning, since they are well below the surface, and the air will be cool. The idea is keep them moist, not soaked, and don’t allow them to dry out.

Sprouts should begin to emerge in two or three weeks, depending on the temperature and weather.

Once they are up and growing, make sure they don’t dry out. Keep the weeds down, and wait. And wait some more… maybe 10 to 14 weeks from planting. A couple of weeks after the flowers come, they should be ready to dig. If you wait a bit longer, they will have grown larger and give you a bigger crop. It depends on the size you want. You can always dig up a couple to satisfy your curiosity and check the size.

Dig them, wash them off lightly, and store them in an airy bag in a cool, dry, dark spot.
Then:
• Smashed potatoes with butter and garlic?
• Late-summer potato salad with dill, sliced hardboiled eggs and mayo?
• Lightly sautéed in a spritz of olive oil?
• Smiles all around.


Filed under Horticulture, Vegetable Gardening

Deck Vegetable Garden

Wouldn’t you love some lovely little home-grown salad greens (rather than the stuff gently rotting in plastic containers?) But don’t have the space, the time, or the money for the gardening equipment displayed in catalogs and websites? Here’s a small, simple, inexpensive deck garden just about anyone can manage.

Hello. I’m Ellen Shapiro, the other horticulture co-chair of the Garden Club of Irvington. No one would put me in the same “grower” class as my co-chair Renee Shamosh. She is a master grower of vegetables (and everything else), having hybridized tomatoes, developed methods for saving seeds, and successfully grown major food crops in a plot on Irvington’s Columbia University property.

Although I loved growing vegetables in a sunny East Hampton garden years ago—it was a group project—three major problems caused my past vegetable-and-herb gardening attempts here in the Rivertowns to fail: (1) Shade (2) Critters (3) Space, lack of it. Last summer, however, a large willow tree fell down and had to be removed. With more sun this year, instead of our usual deck plantings of flowers, I decided to try vegetables in containers: salad varieties that are easy to grow and small (no peas or beans, pumpkins or squash). Here are the steps I followed, and which I hope will work for you, too:

First, there’s the issue of seeds, which are sold out almost everywhere. In early April, I placed an order with Renee’s Garden (a different Renee, this one in Boulder, CO). They eventually sent four packets and gave me a refund for the others. The Burpee seeds were selected from the rack in the local Stop & Shop, and the Hart’s seeds are from Rosedale Nursery on 9A in Hawthorne, where last week there was an excellent selection (with social-distancing measures in place).

Last Sunday, after Home Depot delivered three large bags of potting soil and one bag of seed-starting mix, we were ready to go.

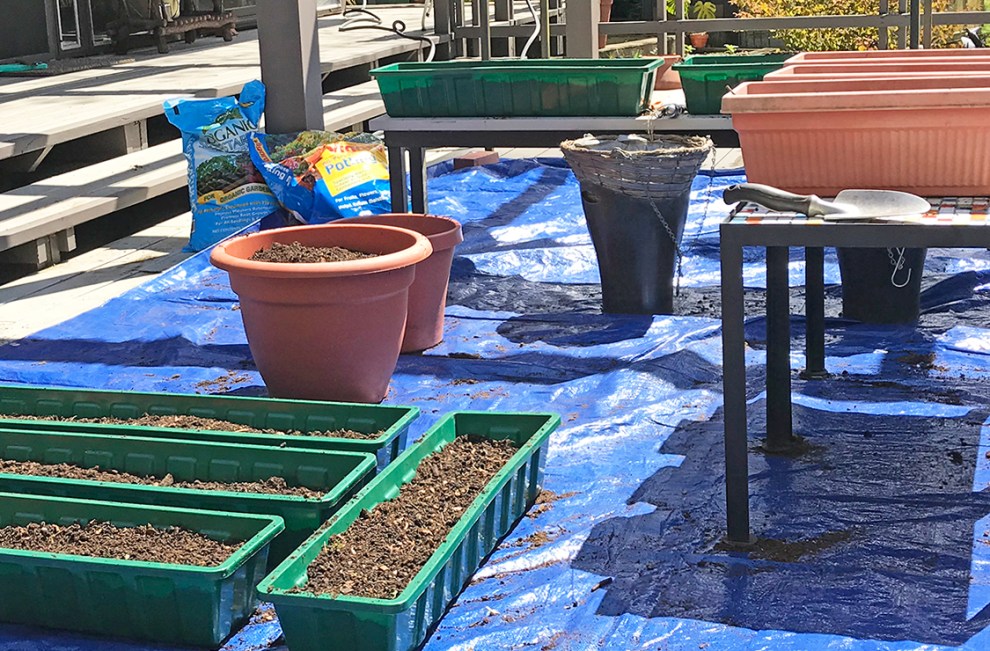
First, my husband Julius and I laid down a tarp to protect the deck from spills. Then we collected and rinsed the containers: lightweight pots, window boxes, and hanging baskets that in past seasons had been used for flowers. We filled them 3/4 full of potting soil and 1/4 with seed-starting mix.

We then followed the directions on the seed packets, which generally consisted of “plant one inch apart, cover with 1/4″ to 1/2″ of fine soil, and gently tamp down.” I watered with our new lightweight, flexible ZeroG hose with Relaxed Gardener Watering Wand, which lets you make fine adjustments to get a soft spray that won’t disturb the soil or the seeds.

Now, how to remember what’s in each container? I made labels by printing the photo of the seed packets on an 8.5 x 11″ sheet of heavy card stock, cutting them out, and taping a small wooden skewer to the back of each.

Yesterday I used a mixed a capful of liquid seed-starting and transplanting fertilizer into two gallons of water and sprinkled the containers. I plan to stay equally vigilant throughout the growing season (insert smiley face here).

It’s strange to see “empty” containers, which just before Mother’s Day every year, were filled with flowers like Begonia ‘blazonry,’ my favorite for hanging baskets.

I’ll re-photograph the containers and post again in a few weeks. Let’s hope the seeds sprout “according to package directions” and that the birds and squirrels stick to their previous diet.


Filed under Horticulture, Vegetable Gardening

Now Is the Time to Start Vegetable and Herb Seeds

Right now, it seems like almost everybody in America wants to grow vegetables and avoid trips to the supermarket. Besides, there’s nothing more delicious than a tomato freshly plucked from the vine or lettuce and herbs snipped from plants growing in containers on your deck.

However, seeds can be difficult to find. One supermarket trip you might want to take is to the Stop & Shop on Route 119 in Tarrytown (wearing your mask and gloves, of course), where there is an almost-full rack of Burpee seeds.

Of course, you can also buy from many online sources. The Etsy seller SeedGeeks, in St. Louis, MO, for example, is getting multiple rave reviews for their quality and reasonably fast shipping; they have 103 different types of vegetable seeds and 30 kinds of herb seeds. (Please buy only what you need; seeds are most viable the first year.)

This is an image from the SeedGeeks.com Etsy shop. You might need to do your own research online to find a seller who has what you want in stock and can ship it in a reasonable time.

Several weeks ago, Garden Club of Irvington Horticulture Co-Chair Renee Shamosh started her seeds in compartmentalized trays filled with seed-starting mix. When they were large enough to transplant she moved them into 3-inch pots.

But it’s definitely not too late for you to get started right now! In fact, some of our members have grown great gardens starting as late as Memorial Day weekend.

These heirloom tomato seedings were grown from seeds Renee saved from tomatoes she grew last year. Many varieties of tomatoes can be grown successfully from seeds. Check the package! And always follow package directions.

In a few weeks Renee’s seedlings will be potted up into these large fiberglas containers, now awaiting planting in her backyard.

These containers, approximately 16″ across and 18″ deep, are large enough for tomatoes, which will grow to 2 to 3 feet high, depending on the variety.

“You can start tomato seeds (or purchased seedlings) directly into pots like these,” Renee advises. “Make sure your pots have drainage holes. A layer of newspaper in the bottom keeps insects from crawling inside the hole. And a layer of pebbles helps with drainage, too.”

The container on the right, which is about 14″ square, is great for lettuce and radishes, which have shallow roots.

What are you going to plant this week or weekend?

“Shallower containers are fine for cool-weather crops like lettuce, Swiss chard, and spinach,” Renee says. Why in containers and not in the ground? So they can be kept on a patio or deck, away from hungry squirrels and birds. However, if you have space directly in the ground that can be protected with fencing, go to it.

The square pot with the pebbles is now filled with regular potting mix to which seed-starting mix was added. Seeds of buttercrunch lettuce have been planted according to package directions.

Filed under Horticulture, Vegetable Gardening